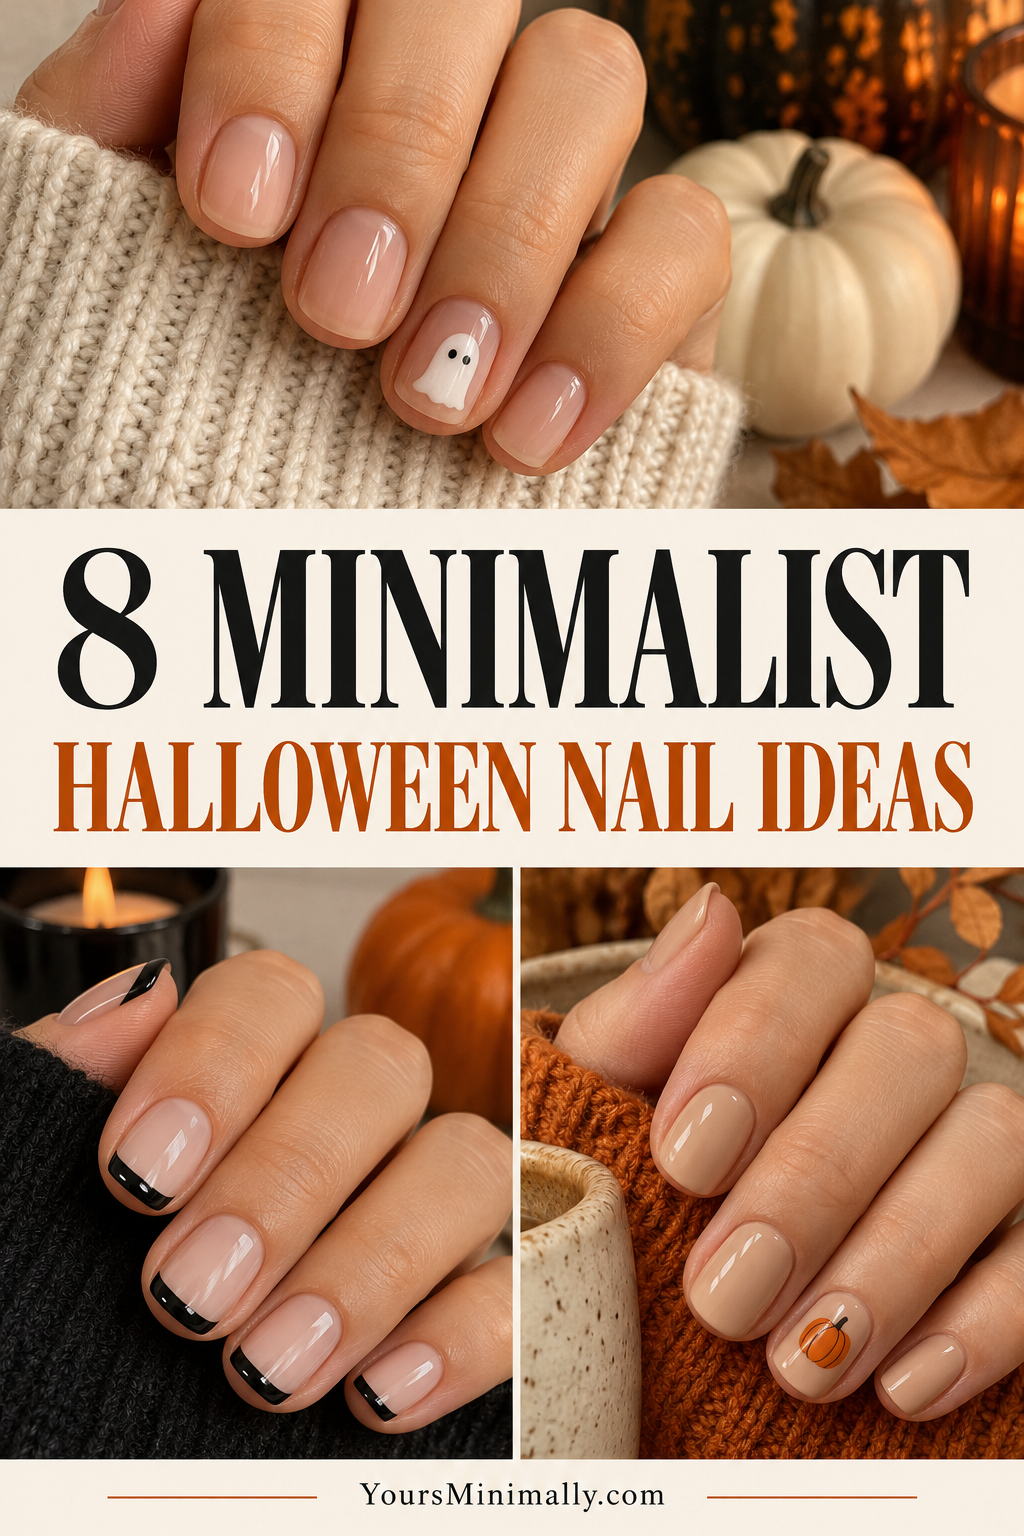
Halloween nails can be small, simple, and easy to wear with the rest of your wardrobe. One tiny ghost, a narrow black tip, or a warm pumpkin accent can create the mood without turning every nail into a different design. These eight ideas are intended for short nails, with room to adjust the shape and base color to your preference. The photographs are visual inspiration rather than step-by-step product demonstrations. Choose a design you can comfortably make with familiar nail products, or show the reference to your nail professional and ask for a version suited to your nails.
Choose the base before the little details
Decide how much contrast you want. A sheer nude base makes a tiny black motif look crisp; warm taupe gives a softer effect; a solid dark manicure needs very little extra decoration. The base should be a color you like on its own, since you may simplify the artwork or decide that one accent nail is enough. Short nails do not need length added to make a Halloween reference readable.
Keep your preferred nail shape rather than changing everything for the design. Rounded and squoval edges are useful starting points for a tidy appearance. If you are painting at home, follow the product instructions, work with ordinary nail products intended for that use, and allow the recommended drying time. For gel or other specialized systems, use the specified equipment and process or book a professional. Decorative images cannot tell you which products will suit your skin or nails.
1. A tiny ghost on a sheer nude base
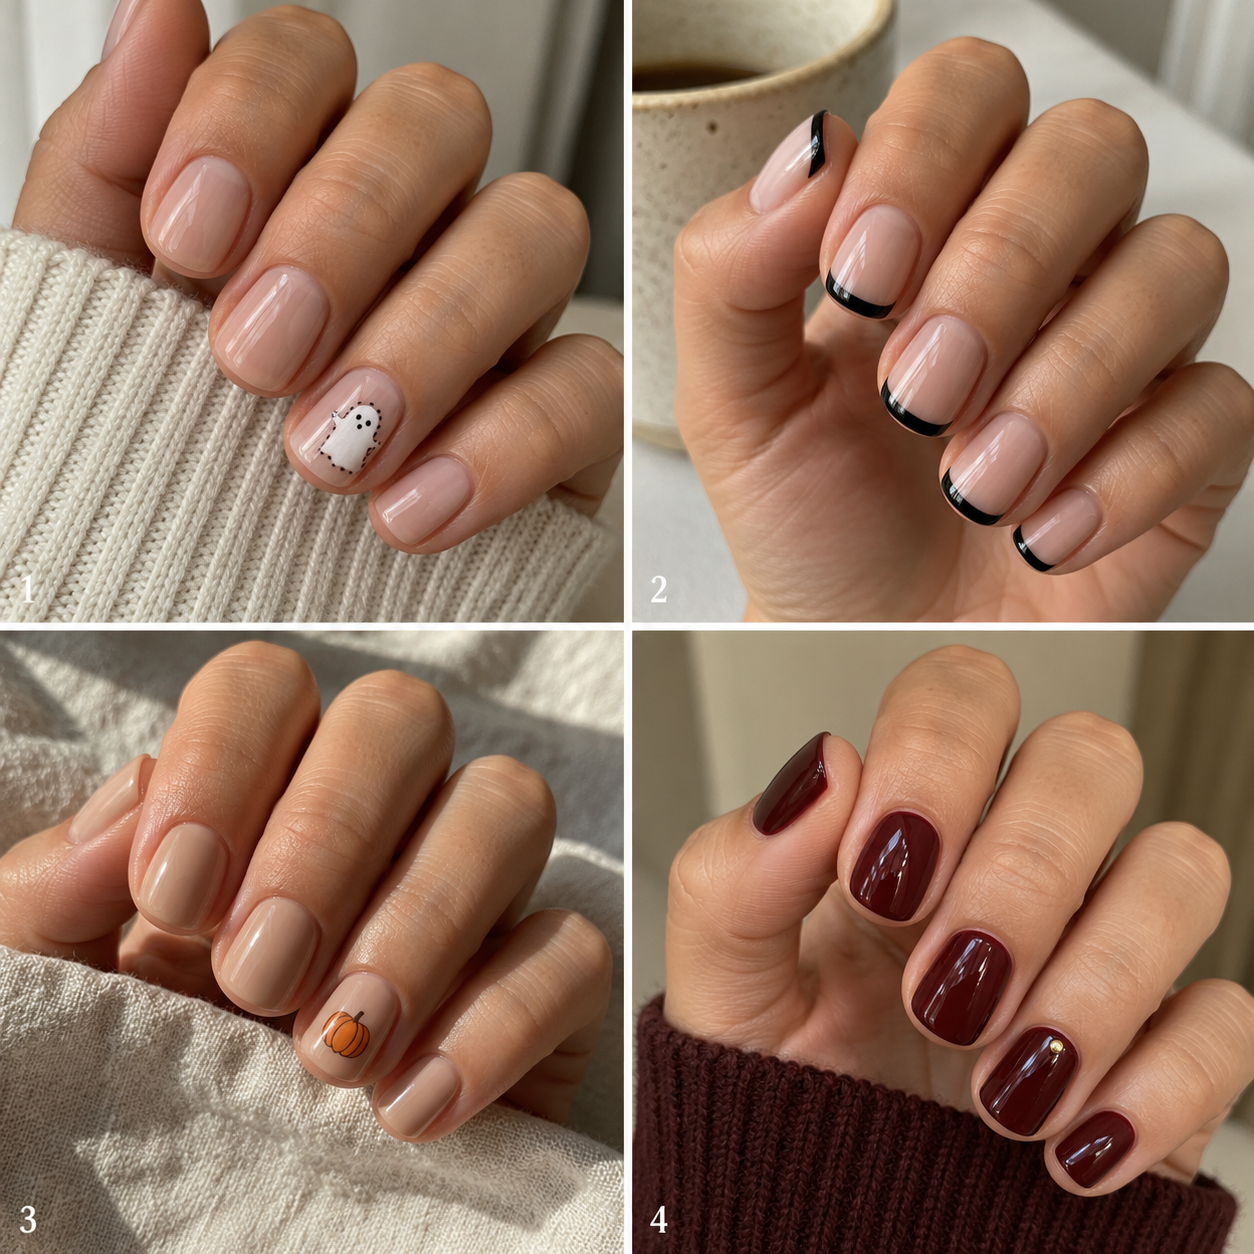
Use a sheer nude manicure with one small white ghost on a ring fingernail. A simple rounded white shape with two tiny black dots reads clearly without needing a full scene. Leave the other nails plain so the ghost stays the focus. On a short nail, place it slightly away from the side edges instead of stretching it across the whole surface. The space around the motif is what keeps the design feeling light.
Choose a base close to the translucent finish you normally wear. If freehand painting feels fiddly, ask a professional for a small accent or use a suitable nail-art decal according to its instructions. Keep the ghost small enough that it does not look crowded once a top coat is added. This is a good starting idea when you want a Halloween detail for a dinner or party but still prefer a manicure that looks understated during the rest of the week.
2. Narrow black French tips
A sheer beige base with narrow black tips gives a classic manicure a darker seasonal mood. Keep the tips fine and consistent rather than making a thick band on each nail. On short squoval nails, a gentle curve that follows the natural edge often looks cleaner than an exaggerated deep smile line. The black contrast provides enough interest on its own; you do not need another symbol on every finger.
Ask for the tip width to be adjusted to your actual nail length. A reference with longer nails may need a much slimmer line to give the same effect on yours. If you are painting at home, practice on one nail before committing to the whole hand and use the method recommended for your products. This design works well with black outfits, denim, or cream knits. It also stays wearable after Halloween because the idea comes from the color contrast rather than a holiday illustration.
3. One small pumpkin on warm beige
Start with warm beige polish and add a tiny orange pumpkin to one ring fingernail. A small green or brown stem is enough to clarify the shape. Keep the pumpkin low on the nail or near one side, leaving a quiet area of beige around it. The warm background softens the orange and makes the manicure feel more autumnal than novelty-driven. Plain nails on the remaining fingers help the accent stand out.
The pumpkin does not need shading, vines, leaves, and a face to work. A simple rounded shape with a few subtle lines is easier to read at a small scale. Choose an orange you enjoy rather than assuming it must be the brightest shade available. This is a useful idea if you want a seasonal design that can stay through the wider fall period. It pairs naturally with brown, burgundy, cream, and denim clothing without needing another orange accessory.
4. Deep burgundy with a single gold dot
A solid deep burgundy manicure offers the simplest Halloween-adjacent option in this group. Add one tiny gold dot near the base of an accent nail if you want a little light, or leave the color entirely plain. Short rounded nails make the dark finish look compact and deliberate. The richness of the color carries the mood, so there is no need for a ghost, pumpkin, and web in the same manicure.
Ask to see the shade in ordinary light before choosing it, since a burgundy can look nearly black in a dim room. A clean outline matters more than complicated artwork here. If you prefer not to use metallic accents, the plain color is a complete choice. This manicure is especially useful when you have several autumn occasions and want one design that can move between them. It looks good with both the dark party outfits and the cream sweaters already common in a fall wardrobe.
5. A tiny black crescent moon
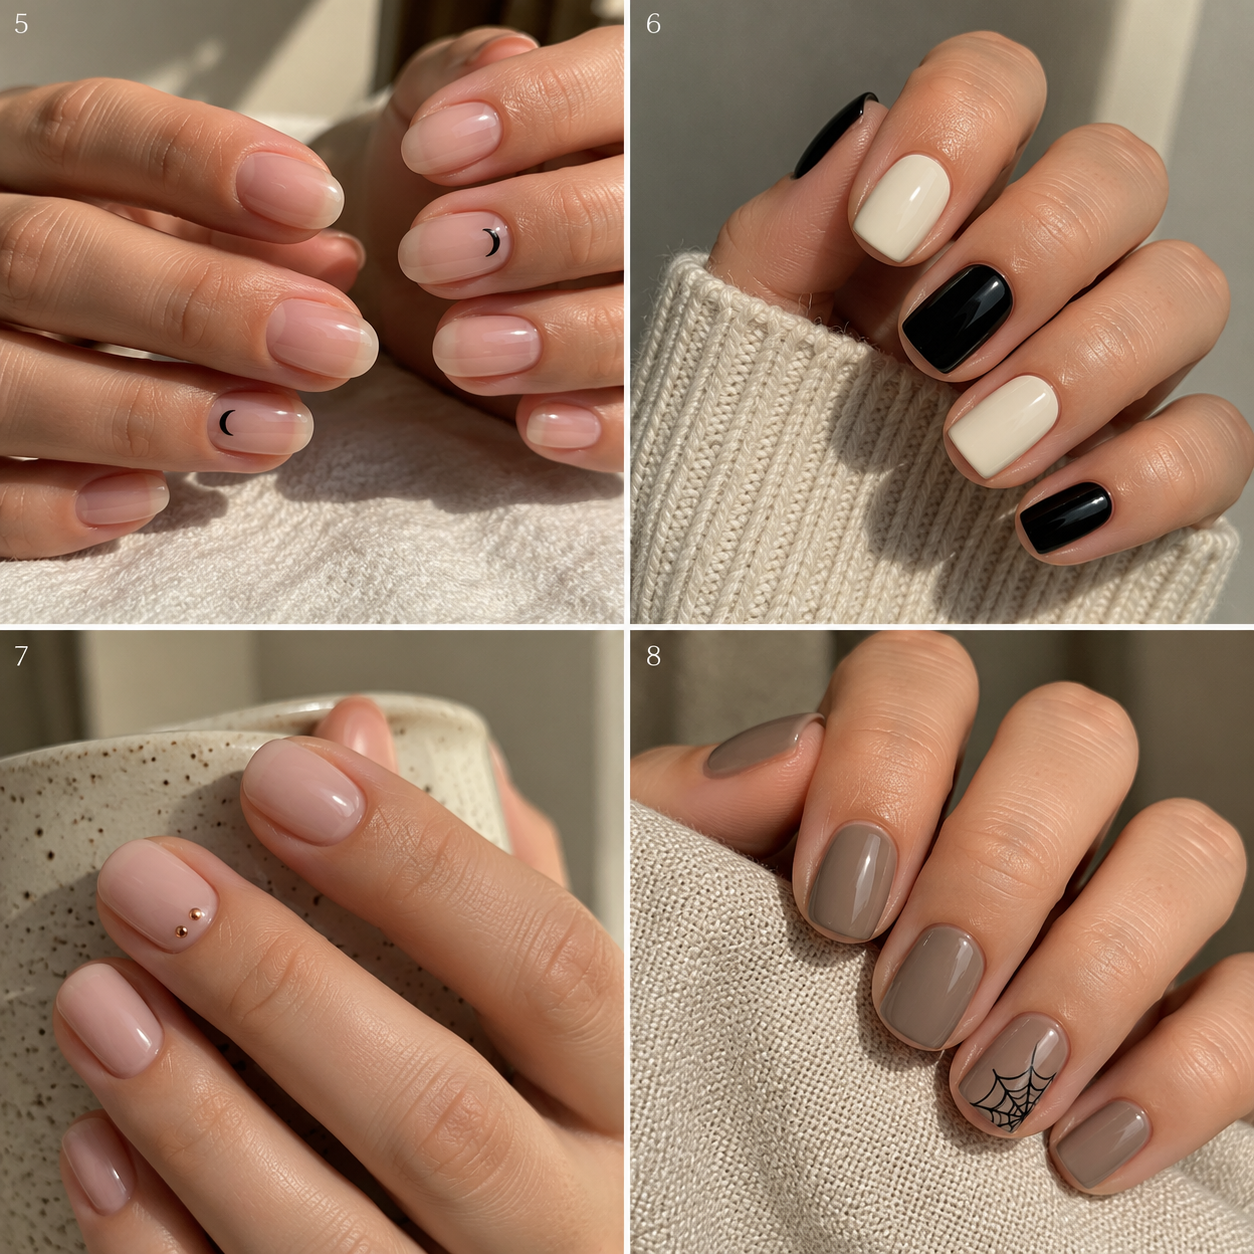
Use a sheer nude base and add a small black crescent to one or two nails. A single moon on each hand feels restrained, while several moons create a stronger pattern. Keep the crescent simple, with enough space around it to show the shape. A short oval or softly tapered nail can support the motif without needing a long pointed extension. The design is a reference to the night sky rather than a full illustration.
Choose the placement with your nail length in mind. A motif near the center is easy to see; a small off-center moon can feel quieter. Avoid adding too many stars if you want the minimalist effect shown in the reference. A professional can scale the symbol to your nails, or a suitable decal can simplify an at-home version. This idea works when you want something seasonal but do not love orange, and it can stay relevant after the Halloween decorations come down.
6. Alternating black and warm cream
Paint alternate nails glossy black and warm cream for a graphic manicure with no detailed artwork. The two colors create the seasonal contrast, while the short square or squoval shape keeps the result tidy. Decide on the sequence before starting so both hands feel intentional. You can mirror the pattern or reverse it on the second hand, depending on whether you prefer symmetry or a slightly playful effect.
Keep the cream warm enough to suit the finish you like. A stark white produces more contrast, while ivory feels softer beside black. Clean color boundaries and an even finish are the main details to focus on. This is one of the easier references to show at a salon because the idea is about placement rather than a very specific drawing. It also works well when you like bold nails but do not want a character or symbol on your hands.
7. Two copper dots near the cuticle
A nude manicure with two tiny copper dots near the base of one nail gives you a very subtle seasonal accent. Keep the dots small and spaced rather than making a large metallic cluster. The warm shine can echo autumn leaves or the glow of a lantern without depicting either one literally. Leave the other nails plain, or repeat the same tiny accent on the matching finger of the other hand.
The contrast should feel deliberate but quiet. If your chosen nude is very opaque, a smaller dot can be enough; a sheer base may make the metallic detail more visible. Ask for a painted effect or another suitable nail-art option that does not feel bulky. This idea is useful when you prefer a manicure that works with everyday office clothes as well as a party outfit. It is also an easy reference to simplify further: one copper dot still gives the look a clear finishing point.
8. A spiderweb corner on taupe
Use warm taupe polish and place a thin black spiderweb in one corner of a single accent nail. Keep the web partial rather than filling the whole nail. A few fine lines are enough to make the reference clear, especially against a quiet base. The remaining nails can stay solid taupe, which gives the detailed nail room to breathe. Short squoval nails suit this idea because the corner creates a natural place for the design.
Ask for the lines to be scaled to the actual nail, not copied at the size shown in a close-up photo. If the web becomes crowded, remove a line instead of adding more. A small decal may be easier than freehand work at home, provided it is intended for nails and used as directed. This is the most explicitly spooky option in the group, but the limited placement keeps it wearable. You do not need an extra spider or several contrasting colors to complete it.
Make the reference work for your own nails
Save the closest image and decide what you like about it: the color, the amount of space, the tip width, or the single accent. That makes it easier to communicate a simpler version if the photographed design does not fit your nail length. You can combine a base from one idea with a motif from another, but choose only one main detail if you want the same restrained effect.
For the quickest appointment request, name the base color, nail shape, and accent placement. For an at-home manicure, choose the design that matches your existing tools rather than buying a large kit for one tiny motif. Allow time for the finish to set before dressing or reaching into a bag. A small, clean design you enjoy wearing is more useful than a complicated manicure you feel you need to protect all evening.
More Halloween ideas
8 Chic Halloween Party Outfits That Don’t Need a Costume · 8 Last-Minute Halloween Costumes You Can Make From Your Closet · 8 Neutral Halloween Decor Ideas That Make a Small Home Feel Cozy